Python使用turtle库绘制小猪佩奇(实例代码)
turtle(海龟)是Python重要的标准库之一,它能够进行基本的图形绘制。turtle图形绘制的概念诞生于1969年,成功应用于LOGO编程语言。
turtle库绘制图形有一个基本框架:一个小海龟在坐标系中爬行,其爬行轨迹形成了绘制图形。刚开始绘制时,小海龟位于画布正中央,此处坐标为(0,0),前进方向为水平右方。
在Python3系列版本安装目录的Lib文件夹下可以找到turtle.py文件。
下面通过代码给大家介绍Python使用turtle库绘制小猪佩奇,
具体代码如下所示:
# -*- coding:utf-8 -*-
import turtle as t
import time
def main():
 t.pensize(4)
 t.hideturtle()
 t.colormode(255)
 t.color((255, 155, 192), "pink")
 t.setup(840, 500)
 t.speed(10)
 # 鼻子
 t.pu()
 t.goto(-100, 100)
 t.pd()
 t.seth(-30)
 t.begin_fill()
 a = 0.4
 for i in range(120):
  if 0 <= i < 30 or 60 <= i < 90:
   a = a + 0.08
   t.lt(3) # 向左转3度
   t.fd(a) # 向前走a的步长
  else:
   a = a - 0.08
   t.lt(3)
   t.fd(a)
 t.end_fill()
 t.pu()
 t.seth(90)
 t.fd(25)
 t.seth(0)
 t.fd(10)
 t.pd()
 t.pencolor(255, 155, 192)
 t.seth(10)
 t.begin_fill()
 t.circle(5)
 t.color(160, 82, 45)
 t.end_fill()
 t.pu()
 t.seth(0)
 t.fd(20)
 t.pd()
 t.pencolor(255, 155, 192)
 t.seth(10)
 t.begin_fill()
 t.circle(5)
 t.color(160, 82, 45)
 t.end_fill()
 # 头
 t.color((255, 155, 192), "pink")
 t.pu()
 t.seth(90)
 t.fd(41)
 t.seth(0)
 t.fd(0)
 t.pd()
 t.begin_fill()
 t.seth(180)
 t.circle(300, -30)
 t.circle(100, -60)
 t.circle(80, -100)
 t.circle(150, -20)
 t.circle(60, -95)
 t.seth(161)
 t.circle(-300, 15)
 t.pu()
 t.goto(-100, 100)
 t.pd()
 t.seth(-30)
 a = 0.4
 for i in range(60):
  if 0 <= i < 30 or 60 <= i < 90:
   a = a + 0.08
   t.lt(3) # 向左转3度
   t.fd(a) # 向前走a的步长
  else:
   a = a - 0.08
   t.lt(3)
   t.fd(a)
 t.end_fill()
 # 耳朵
 t.color((255, 155, 192), "pink")
 t.pu()
 t.seth(90)
 t.fd(-7)
 t.seth(0)
 t.fd(70)
 t.pd()
 t.begin_fill()
 t.seth(100)
 t.circle(-50, 50)
 t.circle(-10, 120)
 t.circle(-50, 54)
 t.end_fill()
 t.pu()
 t.seth(90)
 t.fd(-12)
 t.seth(0)
 t.fd(30)
 t.pd()
 t.begin_fill()
 t.seth(100)
 t.circle(-50, 50)
 t.circle(-10, 120)
 t.circle(-50, 56)
 t.end_fill()
 # 眼睛
 t.color((255, 155, 192), "white")
 t.pu()
 t.seth(90)
 t.fd(-20)
 t.seth(0)
 t.fd(-95)
 t.pd()
 t.begin_fill()
 t.circle(15)
 t.end_fill()
 t.color("black")
 t.pu()
 t.seth(90)
 t.fd(12)
 t.seth(0)
 t.fd(-3)
 t.pd()
 t.begin_fill()
 t.circle(3)
 t.end_fill()
 t.color((255, 155, 192), "white")
 t.pu()
 t.seth(90)
 t.fd(-25)
 t.seth(0)
 t.fd(40)
 t.pd()
 t.begin_fill()
 t.circle(15)
 t.end_fill()
 t.color("black")
 t.pu()
 t.seth(90)
 t.fd(12)
 t.seth(0)
 t.fd(-3)
 t.pd()
 t.begin_fill()
 t.circle(3)
 t.end_fill()
 # 腮
 t.color((255, 155, 192))
 t.pu()
 t.seth(90)
 t.fd(-95)
 t.seth(0)
 t.fd(65)
 t.pd()
 t.begin_fill()
 t.circle(30)
 t.end_fill()
 # 嘴
 t.color(239, 69, 19)
 t.pu()
 t.seth(90)
 t.fd(15)
 t.seth(0)
 t.fd(-100)
 t.pd()
 t.seth(-80)
 t.circle(30, 40)
 t.circle(40, 80)
 # 身体
 t.color("red", (255, 99, 71))
 t.pu()
 t.seth(90)
 t.fd(-20)
 t.seth(0)
 t.fd(-78)
 t.pd()
 t.begin_fill()
 t.seth(-130)
 t.circle(100, 10)
 t.circle(300, 30)
 t.seth(0)
 t.fd(230)
 t.seth(90)
 t.circle(300, 30)
 t.circle(100, 3)
 t.color((255, 155, 192), (255, 100, 100))
 t.seth(-135)
 t.circle(-80, 63)
 t.circle(-150, 24)
 t.end_fill()
 # 手
 t.color((255, 155, 192))
 t.pu()
 t.seth(90)
 t.fd(-40)
 t.seth(0)
 t.fd(-27)
 t.pd()
 t.seth(-160)
 t.circle(300, 15)
 t.pu()
 t.seth(90)
 t.fd(15)
 t.seth(0)
 t.fd(0)
 t.pd()
 t.seth(-10)
 t.circle(-20, 90)
 t.pu()
 t.seth(90)
 t.fd(30)
 t.seth(0)
 t.fd(237)
 t.pd()
 t.seth(-20)
 t.circle(-300, 15)
 t.pu()
 t.seth(90)
 t.fd(20)
 t.seth(0)
 t.fd(0)
 t.pd()
 t.seth(-170)
 t.circle(20, 90)
 # 脚
 t.pensize(10)
 t.color((240, 128, 128))
 t.pu()
 t.seth(90)
 t.fd(-75)
 t.seth(0)
 t.fd(-180)
 t.pd()
 t.seth(-90)
 t.fd(40)
 t.seth(-180)
 t.color("black")
 t.pensize(15)
 t.fd(20)
 t.pensize(10)
 t.color((240, 128, 128))
 t.pu()
 t.seth(90)
 t.fd(40)
 t.seth(0)
 t.fd(90)
 t.pd()
 t.seth(-90)
 t.fd(40)
 t.seth(-180)
 t.color("black")
 t.pensize(15)
 t.fd(20)
 # 尾巴
 t.pensize(4)
 t.color((255, 155, 192))
 t.pu()
 t.seth(90)
 t.fd(70)
 t.seth(0)
 t.fd(95)
 t.pd()
 t.seth(0)
 t.circle(70, 20)
 t.circle(10, 330)
if __name__ == '__main__':
 # 画小猪佩奇
 main()
 time.sleep(10)
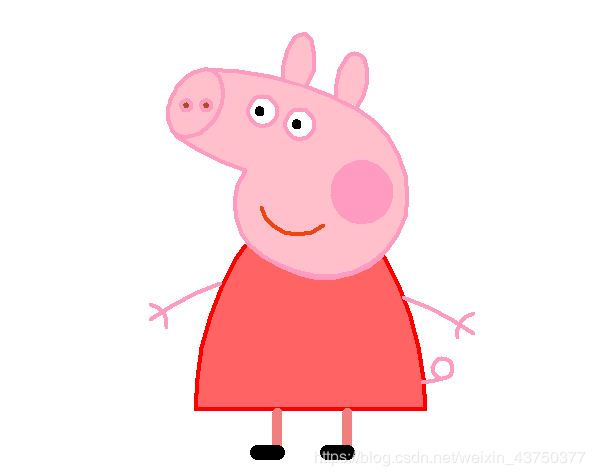
执行结果:
总结
以上所述是小编给大家介绍的Python使用turtle库绘制小猪佩奇,希望对大家有所帮助,如果大家有任何疑问请给我留言,小编会及时回复大家的。在此也非常感谢大家对【听图阁-专注于Python设计】网站的支持!
如果你觉得本文对你有帮助,欢迎转载,烦请注明出处,谢谢!