使用pytorch搭建AlexNet操作(微调预训练模型及手动搭建)
本文介绍了如何在pytorch下搭建AlexNet,使用了两种方法,一种是直接加载预训练模型,并根据自己的需要微调(将最后一层全连接层输出由1000改为10),另一种是手动搭建。
构建模型类的时候需要继承自torch.nn.Module类,要自己重写__ \_\___init__ \_\___方法和正向传递时的forward方法,这里我自己的理解是,搭建网络写在__ \_\___init__ \_\___中,每次正向传递需要计算的部分写在forward中,例如把矩阵压平之类的。
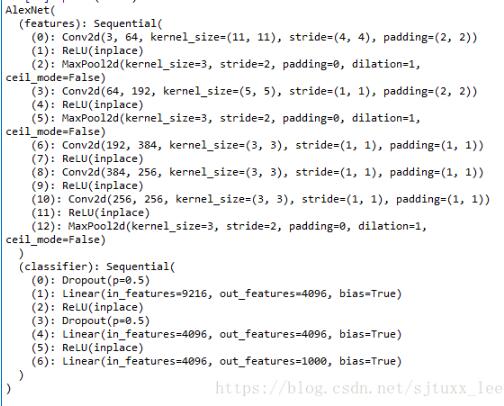
加载预训练alexnet之后,可以print出来查看模型的结构及信息:
model = models.alexnet(pretrained=True)
print(model)
分为两个部分,features及classifier,后续搭建模型时可以也写成这两部分,并且从打印出来的模型信息中也可以看出每一层的引用方式,便于修改,例如model.classifier[1]指的就是Linear(in_features=9216, out_features=4096, bias=True)这层。
下面放出完整的搭建代码:
import torch.nn as nn
from torchvision import models

class BuildAlexNet(nn.Module):
  def __init__(self, model_type, n_output):
    super(BuildAlexNet, self).__init__()
    self.model_type = model_type
    if model_type == 'pre':
      model = models.alexnet(pretrained=True)
      self.features = model.features
      fc1 = nn.Linear(9216, 4096)
      fc1.bias = model.classifier[1].bias
      fc1.weight = model.classifier[1].weight

      fc2 = nn.Linear(4096, 4096)
      fc2.bias = model.classifier[4].bias
      fc2.weight = model.classifier[4].weight

      self.classifier = nn.Sequential(
          nn.Dropout(),
          fc1,
          nn.ReLU(inplace=True),
          nn.Dropout(),
          fc2,
          nn.ReLU(inplace=True),
          nn.Linear(4096, n_output))
      #或者直接修改为
#      model.classifier[6]==nn.Linear(4096,n_output)
#      self.classifier = model.classifier
    if model_type == 'new':
      self.features = nn.Sequential(
          nn.Conv2d(3, 64, 11, 4, 2),
          nn.ReLU(inplace = True),
          nn.MaxPool2d(3, 2, 0),
          nn.Conv2d(64, 192, 5, 1, 2),
          nn.ReLU(inplace=True),
          nn.MaxPool2d(3, 2, 0),
          nn.Conv2d(192, 384, 3, 1, 1),
          nn.ReLU(inplace = True),
          nn.Conv2d(384, 256, 3, 1, 1),
          nn.ReLU(inplace=True),
          nn.MaxPool2d(3, 2, 0))
      self.classifier = nn.Sequential(
          nn.Dropout(),
          nn.Linear(9216, 4096),
          nn.ReLU(inplace=True),
          nn.Dropout(),
          nn.Linear(4096, 4096),
          nn.ReLU(inplace=True),
          nn.Linear(4096, n_output))

  def forward(self, x):
    x = self.features(x)
    x = x.view(x.size(0), -1)
    out = self.classifier(x)
    return out
微调预训练模型的思路为:直接保留原模型的features部分,重写classifier部分。在classifier部分中,我们实际需要修改的只有最后一层全连接层,之前的两个全连接层不需要修改,所以重写的时候需要把这两层的预训练权重和偏移保留下来,也可以像注释掉的两行代码里那样直接引用最后一层全连接层进行修改。
网络搭好之后可以小小的测试一下以检验维度是否正确。
import numpy as np
from torch.autograd import Variable
import torch

if __name__ == '__main__':
  model_type = 'pre'
  n_output = 10
  alexnet = BuildAlexNet(model_type, n_output)
  print(alexnet)

  x = np.random.rand(1,3,224,224)
  x = x.astype(np.float32)
  x_ts = torch.from_numpy(x)
  x_in = Variable(x_ts)
  y = alexnet(x_in)
这里如果不加“x = x.astype(np.float32)”的话会报一个类型错误,感觉有点奇怪。
输出y.data.numpy()可得10维输出,表明网络搭建正确。
以上这篇使用pytorch搭建AlexNet操作(微调预训练模型及手动搭建)就是小编分享给大家的全部内容了,希望能给大家一个参考,也希望大家多多支持【听图阁-专注于Python设计】。