神经网络(BP)算法Python实现及应用
本文实例为大家分享了Python实现神经网络算法及应用的具体代码,供大家参考,具体内容如下
首先用Python实现简单地神经网络算法:
import numpy as np


# 定义tanh函数
def tanh(x):
  return np.tanh(x)


# tanh函数的导数
def tan_deriv(x):
  return 1.0 - np.tanh(x) * np.tan(x)


# sigmoid函数
def logistic(x):
  return 1 / (1 + np.exp(-x))


# sigmoid函数的导数
def logistic_derivative(x):
  return logistic(x) * (1 - logistic(x))


class NeuralNetwork:
  def __init__(self, layers, activation='tanh'):
    """
    神经网络算法构造函数
    :param layers: 神经元层数
    :param activation: 使用的函数(默认tanh函数)
    :return:none
    """
    if activation == 'logistic':
      self.activation = logistic
      self.activation_deriv = logistic_derivative
    elif activation == 'tanh':
      self.activation = tanh
      self.activation_deriv = tan_deriv

    # 权重列表
    self.weights = []
    # 初始化权重(随机)
    for i in range(1, len(layers) - 1):
      self.weights.append((2 * np.random.random((layers[i - 1] + 1, layers[i] + 1)) - 1) * 0.25)
      self.weights.append((2 * np.random.random((layers[i] + 1, layers[i + 1])) - 1) * 0.25)

  def fit(self, X, y, learning_rate=0.2, epochs=10000):
    """
    训练神经网络
    :param X: 数据集(通常是二维)
    :param y: 分类标记
    :param learning_rate: 学习率(默认0.2)
    :param epochs: 训练次数(最大循环次数,默认10000)
    :return: none
    """
    # 确保数据集是二维的
    X = np.atleast_2d(X)

    temp = np.ones([X.shape[0], X.shape[1] + 1])
    temp[:, 0: -1] = X
    X = temp
    y = np.array(y)

    for k in range(epochs):
      # 随机抽取X的一行
      i = np.random.randint(X.shape[0])
      # 用随机抽取的这一组数据对神经网络更新
      a = [X[i]]
      # 正向更新
      for l in range(len(self.weights)):
        a.append(self.activation(np.dot(a[l], self.weights[l])))
      error = y[i] - a[-1]
      deltas = [error * self.activation_deriv(a[-1])]

      # 反向更新
      for l in range(len(a) - 2, 0, -1):
        deltas.append(deltas[-1].dot(self.weights[l].T) * self.activation_deriv(a[l]))
        deltas.reverse()
      for i in range(len(self.weights)):
        layer = np.atleast_2d(a[i])
        delta = np.atleast_2d(deltas[i])
        self.weights[i] += learning_rate * layer.T.dot(delta)

  def predict(self, x):
    x = np.array(x)
    temp = np.ones(x.shape[0] + 1)
    temp[0:-1] = x
    a = temp
    for l in range(0, len(self.weights)):
      a = self.activation(np.dot(a, self.weights[l]))
    return a
使用自己定义的神经网络算法实现一些简单的功能:
小案例:
X: Y
0 0 0
0 1 1
1 0 1
1 1 0
from NN.NeuralNetwork import NeuralNetwork
import numpy as np

nn = NeuralNetwork([2, 2, 1], 'tanh')
temp = [[0, 0], [0, 1], [1, 0], [1, 1]]
X = np.array(temp)
y = np.array([0, 1, 1, 0])
nn.fit(X, y)
for i in temp:
  print(i, nn.predict(i))
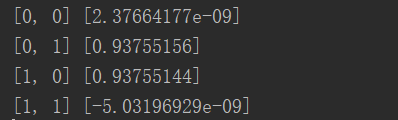
发现结果基本机制,无限接近0或者无限接近1
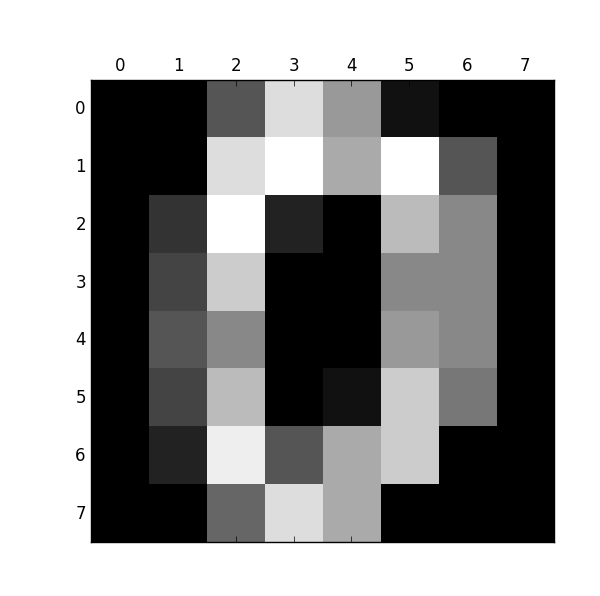
第二个例子:识别图片中的数字
导入数据:
from sklearn.datasets import load_digits
import pylab as pl

digits = load_digits()
print(digits.data.shape)
pl.gray()
pl.matshow(digits.images[0])
pl.show()
观察下:大小:(1797, 64)
数字0
接下来的代码是识别它们:
import numpy as np
from sklearn.datasets import load_digits
from sklearn.metrics import confusion_matrix, classification_report
from sklearn.preprocessing import LabelBinarizer
from NN.NeuralNetwork import NeuralNetwork
from sklearn.cross_validation import train_test_split
# 加载数据集
digits = load_digits()
X = digits.data
y = digits.target
# 处理数据,使得数据处于0,1之间,满足神经网络算法的要求
X -= X.min()
X /= X.max()
# 层数:
# 输出层10个数字
# 输入层64因为图片是8*8的,64像素
# 隐藏层假设100
nn = NeuralNetwork([64, 100, 10], 'logistic')
# 分隔训练集和测试集
X_train, X_test, y_train, y_test = train_test_split(X, y)
# 转化成sklearn需要的二维数据类型
labels_train = LabelBinarizer().fit_transform(y_train)
labels_test = LabelBinarizer().fit_transform(y_test)
print("start fitting")
# 训练3000次
nn.fit(X_train, labels_train, epochs=3000)
predictions = []
for i in range(X_test.shape[0]):
o = nn.predict(X_test[i])
# np.argmax:第几个数对应最大概率值
predictions.append(np.argmax(o))
# 打印预测相关信息
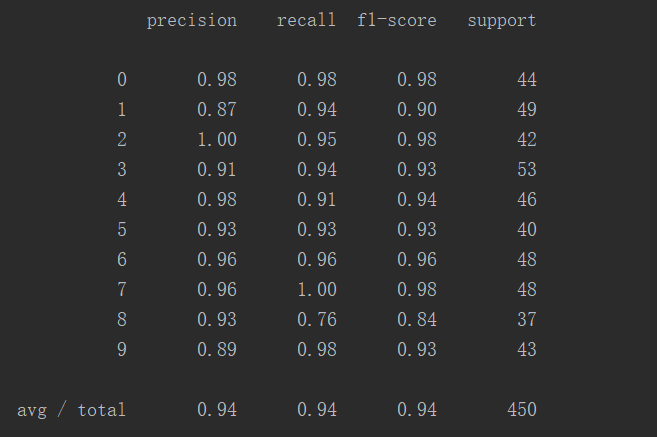
print(confusion_matrix(y_test, predictions))
print(classification_report(y_test, predictions))
结果:
矩阵对角线代表预测正确的数量,发现正确率很多

这张表更直观地显示出预测正确率:
共450个案例,成功率94%
以上就是本文的全部内容,希望对大家的学习有所帮助,也希望大家多多支持【听图阁-专注于Python设计】。