wxPython事件驱动实例详解
本文实例讲述了wxPython的事件驱动机制,分享给大家供大家参考。具体方法如下:
先来看看如下代码:
#!/usr/bin/python

# moveevent.py

import wx  #导入wx库

class MoveEvent(wx.Frame):
  def __init__(self, parent, id, title):
    wx.Frame.__init__(self, parent, id, title, size=(250, 180)) #窗口大小为(250, 180)

    wx.StaticText(self, -1, 'x:', (10,10))#parent, id, title, point
    wx.StaticText(self, -1, 'y:', (10,30))
    self.st1 = wx.StaticText(self, -1, '', (30, 10))
    self.st2 = wx.StaticText(self, -1, '', (30, 30))

    self.Bind(wx.EVT_MOVE, self.OnMove)  #绑定Frame的move事件

    self.Centre()
    self.Show(True)

  def OnMove(self, event):
    x, y = event.GetPosition()
    self.st1.SetLabel(str(x))
    self.st2.SetLabel(str(y))

app = wx.App()#生成应用程序
MoveEvent(None, -1, 'move event')#调用自己的类,三个参数为:parent, id , title
app.MainLoop()#应用程序事件循环
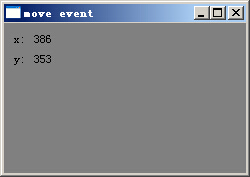
程序运行效果如下图所示:
wxStaticText的两个构造函数官方文档如下:
wxStaticText ()
Default constructor.
wxStaticText (wxWindow *parent, wxWindowID id, const wxString &label, const wxPoint &pos=wxDefaultPosition, const wxSize &size=wxDefaultSize, long style=0, const wxString&name=wxStaticTextNameStr)
Constructor, creating and showing a text control.
The event parameter in the OnMove() method is an object specific to a particular event type. In our case it is the instance of a wx.MoveEvent class. This object holds information about the event. For example the Event object or the position of the window. In our case the Event object is the wx.Frame widget. We can find out the current position by calling the GetPosition() method of the event.
OnMove()方法中的event参数是一种特殊的事件类型,在我们的例子中,它是wx.MoveEvnet类的一个实例.这个对象保存了事件的一些信息,比如这个事件对象或者窗口的位置.在我们例子中事件对象是一个wx.Frame控件.我们可以通过调用事件对象的GetPosition()得到当前位置信息.
Vetoing events
Sometimes we need to stop processing an event. To do this, we call the method Veto().
#!/usr/bin/python

# veto.py

import wx

class Veto(wx.Frame):
  def __init__(self, parent, id, title):
    wx.Frame.__init__(self, parent, id, title, size=(250, 200))


    self.Bind(wx.EVT_CLOSE, self.OnClose)

    self.Centre()
    self.Show(True)

  def OnClose(self, event):

    dial = wx.MessageDialog(None, 'Are you sure to quit?', 'Question',
      wx.YES_NO | wx.NO_DEFAULT | wx.ICON_QUESTION)
    ret = dial.ShowModal()
    if ret == wx.ID_YES:
      self.Destroy()
    else:
      event.Veto()

app = wx.App()
Veto(None, -1, 'Veto')
app.MainLoop()
希望本文所述对大家的Python程序设计有所帮助。