Python tkinter模块弹出窗口及传值回到主窗口操作详解
本文实例讲述了Python tkinter模块弹出窗口及传值回到主窗口操作。分享给大家供大家参考,具体如下:
有些时候,我们需要使用弹出窗口,对程序的运行参数进行设置。有两种选择
一、标准窗口
如果只对一个参数进行设置(或者说从弹出窗口取回一个值),那么可以使用simpledialog,导入方法:
from tkinter.simpledialog import askstring, askinteger, askfloat
完整例子
import tkinter as tk
from tkinter.simpledialog import askstring, askinteger, askfloat
# 接收一个整数
def print_integer():
  res = askinteger("Spam", "Egg count", initialvalue=12*12)
  print(res)
# 接收一个浮点数
def print_float():
  res = askfloat("Spam", "Egg weight\n(in tons)", minvalue=1, maxvalue=100)
  print(res)
# 接收一个字符串
def print_string():
  res = askstring("Spam", "Egg label")
  print(res)
root = tk.Tk()
tk.Button(root, text='取一个字符串', command=print_string).pack()
tk.Button(root, text='取一个整数', command=print_integer).pack()
tk.Button(root, text='取一个浮点数', command=print_float).pack()
root.mainloop()
二、自定义窗口
如果要设置的参数个数超过两个,那么tkinter提供的标准窗口就处理不了了。
这就需要自定义一个窗口,那么问题来了:怎样将自定义窗口中的数据传回主窗口?
百度查询,不外乎两种方法:全局变量(global)、对象变量([]、{}等),都不是我想要的。
然后,去 stackoverflow 逛了一下,综合了个问题的答案,得到两个本人比较满意的方案。
一种是松耦合,另一种是紧耦合
1)松耦合
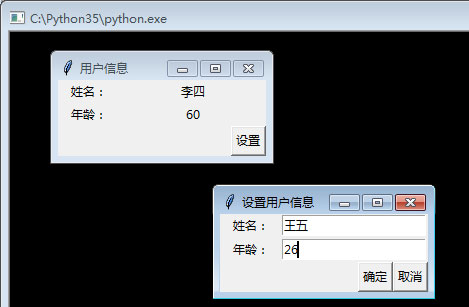
说明:
主窗类,继承了 tk.Tk
弹窗类,继承了 tk.Toplevel
要点:
弹窗,将多个数据,打包,放入一个名为 username 的私有 list 对象,销毁弹窗
主窗,待弹窗运行后,通过wait_window方法,取得弹窗的名为 username 私有变量
完整代码:
import tkinter as tk
'''松耦合'''
# 弹窗
class MyDialog(tk.Toplevel):
  def __init__(self):
    super().__init__()
    self.title('设置用户信息')
    # 弹窗界面
    self.setup_UI()
  def setup_UI(self):
    # 第一行(两列)
    row1 = tk.Frame(self)
    row1.pack(fill="x")
    tk.Label(row1, text='姓名:', width=8).pack(side=tk.LEFT)
    self.name = tk.StringVar()
    tk.Entry(row1, textvariable=self.name, width=20).pack(side=tk.LEFT)
    # 第二行
    row2 = tk.Frame(self)
    row2.pack(fill="x", ipadx=1, ipady=1)
    tk.Label(row2, text='年龄:', width=8).pack(side=tk.LEFT)
    self.age = tk.IntVar()
    tk.Entry(row2, textvariable=self.age, width=20).pack(side=tk.LEFT)
    # 第三行
    row3 = tk.Frame(self)
    row3.pack(fill="x")
    tk.Button(row3, text="取消", command=self.cancel).pack(side=tk.RIGHT)
    tk.Button(row3, text="确定", command=self.ok).pack(side=tk.RIGHT)
  def ok(self):
    self.userinfo = [self.name.get(), self.age.get()] # 设置数据
    self.destroy() # 销毁窗口
  def cancel(self):
    self.userinfo = None # 空!
    self.destroy()
# 主窗
class MyApp(tk.Tk):
  def __init__(self):
    super().__init__()
    #self.pack() # 若继承 tk.Frame ,此句必须有!
    self.title('用户信息')
    # 程序参数/数据
    self.name = '张三'
    self.age = 30
    # 程序界面
    self.setupUI()
  def setupUI(self):
    # 第一行(两列)
    row1 = tk.Frame(self)
    row1.pack(fill="x")
    tk.Label(row1, text='姓名:', width=8).pack(side=tk.LEFT)
    self.l1 = tk.Label(row1, text=self.name, width=20)
    self.l1.pack(side=tk.LEFT)
    # 第二行
    row2 = tk.Frame(self)
    row2.pack(fill="x")
    tk.Label(row2, text='年龄:', width=8).pack(side=tk.LEFT)
    self.l2 = tk.Label(row2, text=self.age, width=20)
    self.l2.pack(side=tk.LEFT)
    # 第三行
    row3 = tk.Frame(self)
    row3.pack(fill="x")
    tk.Button(row3, text="设置", command=self.setup_config).pack(side=tk.RIGHT)
  # 设置参数
  def setup_config(self):
    # 接收弹窗的数据
    res = self.ask_userinfo()
    #print(res)
    if res is None: return
    # 更改参数
    self.name, self.age = res
    # 更新界面
    self.l1.config(text=self.name)
    self.l2.config(text=self.age)
  # 弹窗
  def ask_userinfo(self):
    inputDialog = MyDialog()
    self.wait_window(inputDialog) # 这一句很重要!!!
    return inputDialog.userinfo
if __name__ == '__main__':
  app = MyApp()
  app.mainloop()
2)紧耦合
说明:
主窗类,继承了 tk.Tk
弹窗类,继承了 tk.Toplevel
要点:
弹窗,显式地保存父窗口,显式地修改父窗口数据,显式地更新父窗口部件,最后销毁弹窗
主窗,待弹窗运行后,通过wait_window方法,返回 None
完整代码:
import tkinter as tk
'''紧耦合'''
# 弹窗
class PopupDialog(tk.Toplevel):
  def __init__(self, parent):
    super().__init__()
    self.title('设置用户信息')
    self.parent = parent # 显式地保留父窗口
    # 第一行(两列)
    row1 = tk.Frame(self)
    row1.pack(fill="x")
    tk.Label(row1, text='姓名:', width=8).pack(side=tk.LEFT)
    self.name = tk.StringVar()
    tk.Entry(row1, textvariable=self.name, width=20).pack(side=tk.LEFT)
    # 第二行
    row2 = tk.Frame(self)
    row2.pack(fill="x", ipadx=1, ipady=1)
    tk.Label(row2, text='年龄:', width=8).pack(side=tk.LEFT)
    self.age = tk.IntVar()
    tk.Entry(row2, textvariable=self.age, width=20).pack(side=tk.LEFT)
    # 第三行
    row3 = tk.Frame(self)
    row3.pack(fill="x")
    tk.Button(row3, text="取消", command=self.cancel).pack(side=tk.RIGHT)
    tk.Button(row3, text="确定", command=self.ok).pack(side=tk.RIGHT)
  def ok(self):
    # 显式地更改父窗口参数
    self.parent.name = self.name.get()
    self.parent.age = self.age.get()
    # 显式地更新父窗口界面
    self.parent.l1.config(text=self.parent.name)
    self.parent.l2.config(text=self.parent.age)
    self.destroy() # 销毁窗口
  def cancel(self):
    self.destroy()
# 主窗
class MyApp(tk.Tk):
  def __init__(self):
    super().__init__()
    # self.pack() # 若继承 tk.Frame,此句必须有!!!
    self.title('用户信息')
    # 程序参数
    self.name = '张三'
    self.age = 30
    # 程序界面
    self.setupUI()
  def setupUI(self):
    # 第一行(两列)
    row1 = tk.Frame(self)
    row1.pack(fill="x")
    tk.Label(row1, text='姓名:', width=8).pack(side=tk.LEFT)
    self.l1 = tk.Label(row1, text=self.name, width=20)
    self.l1.pack(side=tk.LEFT)
    # 第二行
    row2 = tk.Frame(self)
    row2.pack(fill="x")
    tk.Label(row2, text='年龄:', width=8).pack(side=tk.LEFT)
    self.l2 = tk.Label(row2, text=self.age, width=20)
    self.l2.pack(side=tk.LEFT)
    # 第三行
    row3 = tk.Frame(self)
    row3.pack(fill="x")
    tk.Button(row3, text="设置", command=self.setup_config).pack(side=tk.RIGHT)
  # 设置参数
  def setup_config(self):
    pw = PopupDialog(self)
    self.wait_window(pw) # 这一句很重要!!!
    return
if __name__ == '__main__':
  app = MyApp()
  app.mainloop()
效果图
更多关于Python相关内容感兴趣的读者可查看本站专题:《Python编码操作技巧总结》、《Python数据结构与算法教程》、《Python函数使用技巧总结》、《Python字符串操作技巧汇总》及《Python入门与进阶经典教程》
希望本文所述对大家Python程序设计有所帮助。