运动检测ViBe算法python实现代码
运动物体检测一般分为背景建模和运动物体分析两步。即构建不包含运动物体的背景模型。然后将新的视频帧和背景模型对比,找出其中的运动物体。目前比较好的背景建模算法有两种:1)文章(Zivkovic Z. (2004) Improved adaptive Gausianmixture model for backgroundsubtraction, Proceedings of ICPR 2004, August 23-26, Cambridge, UK.)提出的高斯混合模型法。在此算法中,背景的每一个像素都被拟合到一个高斯混合模型。对于新的图片,只需要判断每个像素是否服从这个高斯混合模型就可以判断出这个像素是背景还是前景。但混合高斯算法的缺点是计算量相对比较大,速度偏慢,对光照敏感。2)文章(ViBe: A universal backgroundsubtraction algorithm for video sequences.)提出的ViBe算法。该算法速度非常快,计算量比较小,而且对噪声有一定的鲁棒性,检测效果不错。
由于最近在做一些跟踪检查的研究,就用到了ViBe算法,根据网上的c++版本编写了这个python版的算法,在这分享给大家。
class ViBe:
 '''''
 classdocs
 '''
 __defaultNbSamples = 20  #每个像素点的样本个数
 __defaultReqMatches = 2  #min指数
 __defaultRadius = 20;   #Sqthere半径
 __defaultSubsamplingFactor = 16#子采样概率
 __BG = 0      #背景像素
 __FG = 255      #前景像素
 __c_xoff=[-1,0,1,-1,1,-1,0,1,0] #x的邻居点 len=9
 __c_yoff=[-1,0,1,-1,1,-1,0,1,0] #y的邻居点 len=9

 __samples=[]    #保存每个像素点的样本值,len defaultNbSamples+1
 __Height = 0
 __Width = 0

 def __init__(self, grayFrame):
  '''''
  Constructor
  '''
  self.__Height = grayFrame.shape[0]
  self.__Width = grayFrame.shape[1]


  for i in range(self.__defaultNbSamples+1):
   self.__samples.insert(i,np.zeros((grayFrame.shape[0],grayFrame.shape[1]),dtype=grayFrame.dtype));

  self.__init_params(grayFrame)

 def __init_params(self,grayFrame):
  #记录随机生成的 行(r) 和 列(c)
  rand=0
  r=0
  c=0

  #对每个像素样本进行初始化
  for y in range(self.__Height):
   for x in range(self.__Width):
    for k in range(self.__defaultNbSamples):
     #随机获取像素样本值
     rand=random.randint(0,8)
     r=y+self.__c_yoff[rand]
     if r<0:
      r=0
     if r>=self.__Height:
      r=self.__Height-1 #行
     c=x+self.__c_xoff[rand]
     if c<0:
      c=0
     if c>=self.__Width:
      c=self.__Width-1  #列
     #存储像素样本值
     self.__samples[k][y,x] = grayFrame[r,c]
   self.__samples[self.__defaultNbSamples][y,x] = 0

 def update(self,grayFrame,frameNo):
  foreground = np.zeros((self.__Height,self.__Width),dtype=np.uint8)
  for y in range(self.__Height): #Height
   for x in range(self.__Width):  #Width
    #用于判断一个点是否是背景点,index记录已比较的样本个数,count表示匹配的样本个数
    count=0;index=0;
    dist=0.0;
    while (count<self.__defaultReqMatches) and (index<self.__defaultNbSamples):
     dist= float(grayFrame[y,x]) - float(self.__samples[index][y,x]);
     if dist<0: dist=-dist
     if dist<self.__defaultRadius: count = count+1
     index = index+1

    if count>=self.__defaultReqMatches:
     #判断为背景像素,只有背景点才能被用来传播和更新存储样本值
     self.__samples[self.__defaultNbSamples][y,x]=0

     foreground[y,x] = self.__BG

     rand=random.randint(0,self.__defaultSubsamplingFactor)
     if rand==0:
      rand=random.randint(0,self.__defaultNbSamples)
      self.__samples[rand][y,x]=grayFrame[y,x]
     rand=random.randint(0,self.__defaultSubsamplingFactor)
     if rand==0:
      rand=random.randint(0,8)
      yN=y+self.__c_yoff[rand]
      if yN<0: yN=0
      if yN>=self.__Height: yN=self.__Height-1
      rand=random.randint(0,8)
      xN=x+self.__c_xoff[rand]
      if xN<0: xN=0
      if xN>=self.__Width: xN=self.__Width-1
      rand=random.randint(0,self.__defaultNbSamples)
      self.__samples[rand][yN,xN]=grayFrame[y,x]
    else:
     #判断为前景像素
     foreground[y,x] = self.__FG;
     self.__samples[self.__defaultNbSamples][y,x] += 1
     if self.__samples[self.__defaultNbSamples][y,x]>50:
      rand=random.randint(0,self.__defaultNbSamples)
      if rand==0:
       rand=random.randint(0,self.__defaultNbSamples)
       self.__samples[rand][y,x]=grayFrame[y,x]
  return foreground
我做的鱼的跟踪效果图
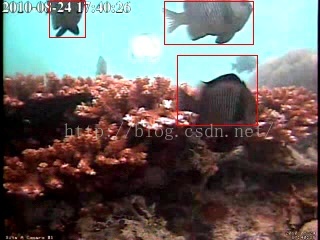
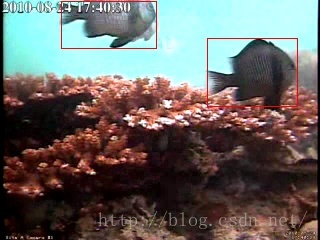
以上就是本文的全部内容,希望对大家的学习有所帮助,也希望大家多多支持【听图阁-专注于Python设计】。