pytorch构建网络模型的4种方法
利用pytorch来构建网络模型有很多种方法,以下简单列出其中的四种。
假设构建一个网络模型如下:
卷积层--》Relu层--》池化层--》全连接层--》Relu层--》全连接层
首先导入几种方法用到的包:
import torch
import torch.nn.functional as F
from collections import OrderedDict
第一种方法
# Method 1 -----------------------------------------
class Net1(torch.nn.Module):
def __init__(self):
super(Net1, self).__init__()
self.conv1 = torch.nn.Conv2d(3, 32, 3, 1, 1)
self.dense1 = torch.nn.Linear(32 * 3 * 3, 128)
self.dense2 = torch.nn.Linear(128, 10)
def forward(self, x):
x = F.max_pool2d(F.relu(self.conv(x)), 2)
x = x.view(x.size(0), -1)
x = F.relu(self.dense1(x))
x = self.dense2(x)
return x
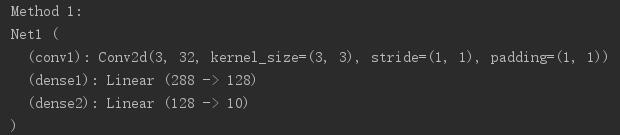
print("Method 1:")
model1 = Net1()
print(model1)
这种方法比较常用,早期的教程通常就是使用这种方法。
第二种方法
# Method 2 ------------------------------------------
class Net2(torch.nn.Module):
  def __init__(self):
    super(Net2, self).__init__()
    self.conv = torch.nn.Sequential(
      torch.nn.Conv2d(3, 32, 3, 1, 1),
      torch.nn.ReLU(),
      torch.nn.MaxPool2d(2))
    self.dense = torch.nn.Sequential(
      torch.nn.Linear(32 * 3 * 3, 128),
      torch.nn.ReLU(),
      torch.nn.Linear(128, 10)
    )

  def forward(self, x):
    conv_out = self.conv1(x)
    res = conv_out.view(conv_out.size(0), -1)
    out = self.dense(res)
    return out

print("Method 2:")
model2 = Net2()
print(model2)
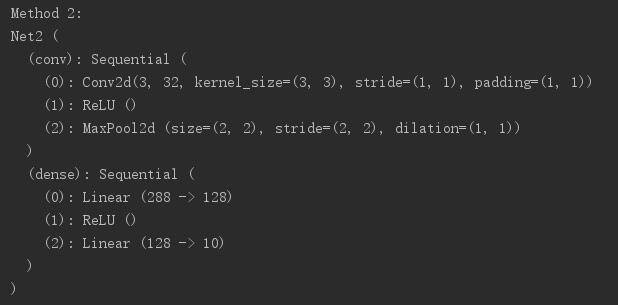
这种方法利用torch.nn.Sequential()容器进行快速搭建,模型的各层被顺序添加到容器中。缺点是每层的编号是默认的阿拉伯数字,不易区分。
第三种方法:
# Method 3 -------------------------------
class Net3(torch.nn.Module):
  def __init__(self):
    super(Net3, self).__init__()
    self.conv=torch.nn.Sequential()
    self.conv.add_module("conv1",torch.nn.Conv2d(3, 32, 3, 1, 1))
    self.conv.add_module("relu1",torch.nn.ReLU())
    self.conv.add_module("pool1",torch.nn.MaxPool2d(2))
    self.dense = torch.nn.Sequential()
    self.dense.add_module("dense1",torch.nn.Linear(32 * 3 * 3, 128))
    self.dense.add_module("relu2",torch.nn.ReLU())
    self.dense.add_module("dense2",torch.nn.Linear(128, 10))

  def forward(self, x):
    conv_out = self.conv1(x)
    res = conv_out.view(conv_out.size(0), -1)
    out = self.dense(res)
    return out

print("Method 3:")
model3 = Net3()
print(model3)
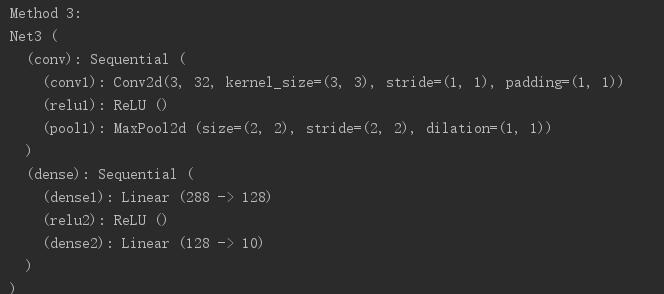
这种方法是对第二种方法的改进:通过add_module()添加每一层,并且为每一层增加了一个单独的名字。
第四种方法:
# Method 4 ------------------------------------------
class Net4(torch.nn.Module):
  def __init__(self):
    super(Net4, self).__init__()
    self.conv = torch.nn.Sequential(
      OrderedDict(
        [
          ("conv1", torch.nn.Conv2d(3, 32, 3, 1, 1)),
          ("relu1", torch.nn.ReLU()),
          ("pool", torch.nn.MaxPool2d(2))
        ]
      ))

    self.dense = torch.nn.Sequential(
      OrderedDict([
        ("dense1", torch.nn.Linear(32 * 3 * 3, 128)),
        ("relu2", torch.nn.ReLU()),
        ("dense2", torch.nn.Linear(128, 10))
      ])
    )

  def forward(self, x):
    conv_out = self.conv1(x)
    res = conv_out.view(conv_out.size(0), -1)
    out = self.dense(res)
    return out

print("Method 4:")
model4 = Net4()
print(model4)

是第三种方法的另外一种写法,通过字典的形式添加每一层,并且设置单独的层名称。
完整代码:
import torch
import torch.nn.functional as F
from collections import OrderedDict

# Method 1 -----------------------------------------

class Net1(torch.nn.Module):
  def __init__(self):
    super(Net1, self).__init__()
    self.conv1 = torch.nn.Conv2d(3, 32, 3, 1, 1)
    self.dense1 = torch.nn.Linear(32 * 3 * 3, 128)
    self.dense2 = torch.nn.Linear(128, 10)

  def forward(self, x):
    x = F.max_pool2d(F.relu(self.conv(x)), 2)
    x = x.view(x.size(0), -1)
    x = F.relu(self.dense1(x))
    x = self.dense2()
    return x

print("Method 1:")
model1 = Net1()
print(model1)


# Method 2 ------------------------------------------
class Net2(torch.nn.Module):
  def __init__(self):
    super(Net2, self).__init__()
    self.conv = torch.nn.Sequential(
      torch.nn.Conv2d(3, 32, 3, 1, 1),
      torch.nn.ReLU(),
      torch.nn.MaxPool2d(2))
    self.dense = torch.nn.Sequential(
      torch.nn.Linear(32 * 3 * 3, 128),
      torch.nn.ReLU(),
      torch.nn.Linear(128, 10)
    )

  def forward(self, x):
    conv_out = self.conv1(x)
    res = conv_out.view(conv_out.size(0), -1)
    out = self.dense(res)
    return out

print("Method 2:")
model2 = Net2()
print(model2)


# Method 3 -------------------------------
class Net3(torch.nn.Module):
  def __init__(self):
    super(Net3, self).__init__()
    self.conv=torch.nn.Sequential()
    self.conv.add_module("conv1",torch.nn.Conv2d(3, 32, 3, 1, 1))
    self.conv.add_module("relu1",torch.nn.ReLU())
    self.conv.add_module("pool1",torch.nn.MaxPool2d(2))
    self.dense = torch.nn.Sequential()
    self.dense.add_module("dense1",torch.nn.Linear(32 * 3 * 3, 128))
    self.dense.add_module("relu2",torch.nn.ReLU())
    self.dense.add_module("dense2",torch.nn.Linear(128, 10))

  def forward(self, x):
    conv_out = self.conv1(x)
    res = conv_out.view(conv_out.size(0), -1)
    out = self.dense(res)
    return out

print("Method 3:")
model3 = Net3()
print(model3)


# Method 4 ------------------------------------------
class Net4(torch.nn.Module):
  def __init__(self):
    super(Net4, self).__init__()
    self.conv = torch.nn.Sequential(
      OrderedDict(
        [
          ("conv1", torch.nn.Conv2d(3, 32, 3, 1, 1)),
          ("relu1", torch.nn.ReLU()),
          ("pool", torch.nn.MaxPool2d(2))
        ]
      ))

    self.dense = torch.nn.Sequential(
      OrderedDict([
        ("dense1", torch.nn.Linear(32 * 3 * 3, 128)),
        ("relu2", torch.nn.ReLU()),
        ("dense2", torch.nn.Linear(128, 10))
      ])
    )

  def forward(self, x):
    conv_out = self.conv1(x)
    res = conv_out.view(conv_out.size(0), -1)
    out = self.dense(res)
    return out

print("Method 4:")
model4 = Net4()
print(model4)
以上就是本文的全部内容,希望对大家的学习有所帮助,也希望大家多多支持【听图阁-专注于Python设计】。