python numpy 显示图像阵列的实例
每次要显示图像阵列的时候,使用自带的 matplotlib 或者cv2 都要设置一大堆东西,subplot,fig等等,突然想起 可以利用numpy 的htstack() 和 vstack() 将图片对接起来组成一张新的图片。因此写了写了下面的函数。做了部分注释,一些比较绕的地方可以自行体会。
大致流程包括:
1、输入图像列表 img_list
2、show_type : 最终的显示方式,输入为行数列数 (例如 show_type=22 ,则最终显示图片为两行两列)
3、basic_shape, 图片resize的尺寸。
def image_show( img_list, show_type, basic_size=[300,500]):
 '''
  img_list contains the images that need to be stitched,
  the show_typ contains the final shape of the stitched one, ie, 12 for 1 row 2 cols.
  basic_size : all input image need to be reshaped first.

 '''
 # reshap row and col number.
 n_row, n_col = basic_size
 #print n_row,n_col

 # num of pixels need to be filled vertically and horizontally.
 h_filling = 10
 v_filling = 10


 # image resize.
 resize_list=[]
 for i in img_list:
  temp_img = cv2.resize( i, ( n_col, n_row ), interpolation = cv2. INTER_CUBIC )
  resize_list.append( temp_img )

 # resolve the final stitched image 's shape.
 n_row_img, n_col_img = show_type/10, show_type%10
 #print n_row_img, n_col_img

 # the blank_img and the image need to be filled should be defined firstly.
 blank_img= np.ones([n_row,n_col])*255
 blank_img= np.array( blank_img, np.uint8 )
 v_img= np.array( np.ones([n_row,v_filling])*255, np.uint8)
 h_img= np.array( np.ones ([ h_filling, n_col_img*n_col+(n_col_img-1)*h_filling])*255, np.uint8)


 # images in the image list should be dispatched into different sub-list
 # in each sub list the images will be connected horizontally.
 recombination_list=[]
 temp_list=[]
 n_list= len(resize_list)
 for index, i in enumerate ( xrange (n_list)):
  if index!= 0 and index % n_col_img==0 :
   recombination_list.append(temp_list)
   temp_list = []
   if len(resize_list)> n_col_img:
    pass
   else:
    recombination_list.append(resize_list)
    break
  temp_list.append( resize_list.pop(0))
 if n_list== n_col_img:
  recombination_list.append(temp_list)
 #print len(temp_list)
 #print temp_list


 # stack the images horizontally.
 h_temp=[]
 for i in recombination_list:
  #print len(i)
  if len(i)==n_col_img:

   temp_new_i=[ [j,v_img] if index+1 != len(i) else j for index, j in enumerate (i) ]
   new_i=[ j for i in temp_new_i[:-1] for j in i ]
   new_i.append( temp_new_i[-1])
   h_temp.append(np.hstack(new_i))
  else:

   add_n= n_col_img - len(i)
   for k in range(add_n):
    i.append(blank_img)

   temp_new_i=[ [j,v_img] if index+1 != len(i) else j for index, j in enumerate (i) ]
   new_i=[ j for i in temp_new_i[:-1] for j in i ]
   new_i.append( temp_new_i[-1])

   h_temp.append(np.hstack(new_i))


 #print len(h_temp)
 #print h_temp

 temp_full_img= [ [j, h_img ] if index+1 != len(h_temp) else j for index, j in enumerate(h_temp) ]
 if len(temp_full_img) > 2:
  full_img= [ j for i in temp_full_img[:-1] for j in i ]
  full_img.append(temp_full_img[-1])
 else:
  full_img= [ j for i in temp_full_img for j in i ]
  #full_img.append(temp_full_img[-1])


 if len(full_img)>1:
  return np.vstack( full_img)
 else:
  return full_img
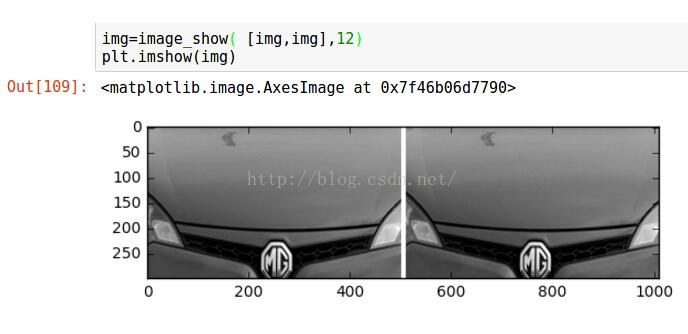
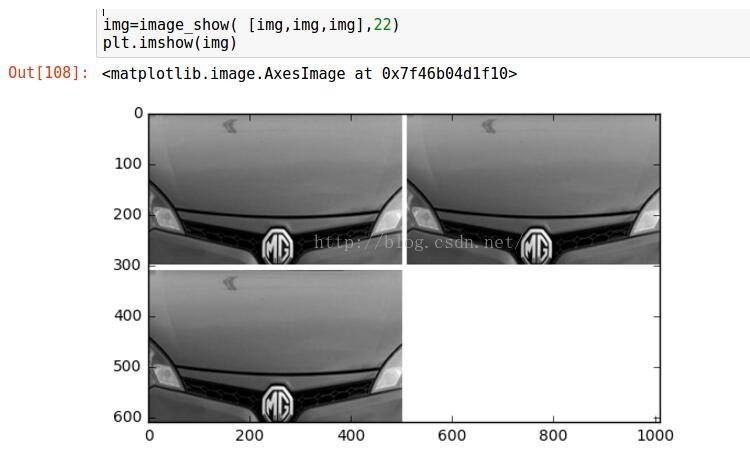
最终输入情况和结果如下图:
第一组结果图:自行看输入
第二组结果图。
以上这篇python numpy 显示图像阵列的实例就是小编分享给大家的全部内容了,希望能给大家一个参考,也希望大家多多支持【听图阁-专注于Python设计】。