python仿抖音表白神器
Python能够干嘛?
可以做日常任务,比如自动备份你的MP3;
可以做网站,很多著名的网站像知乎、YouTube就是Python写的;
可以做网络游戏的后台,很多在线游戏的后台都是Python开发的。
上面说的这些本人并没有实现过;
但是我知道Python可以做一些有趣的东西,比如仿制抖音表白小软件;
本人也是刚刚学习Python,这个脚本通过百度找到的,然后自己也重新写了一遍,加深了映像,最主要的还是思路要清晰;
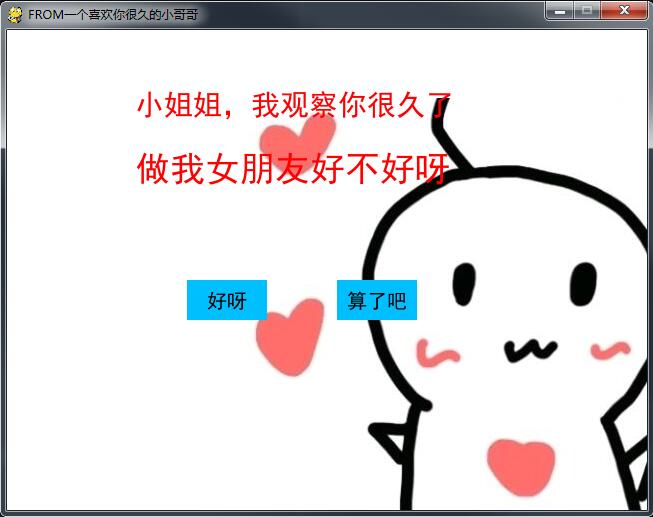
流程:
1、创建一个游戏屏幕
2、加载title
3、加载button,
4、当鼠标移动到 '算了吧' 上面的时候 重加加载桌面并随机生成一个 '算了吧' 坐标;
5、当鼠标移动到 ‘好呀'上面时 显示不同的title
以下就是Python脚本:
import pygame
import random


# 设置游戏屏幕大小 这是一个常量
WIDTH, HEIGHT = 640, 480

screen = pygame.display.set_mode((WIDTH, HEIGHT), 0, 32)
pygame.display.set_caption('FROM一个喜欢你很久的小哥哥')

# 标题
def title(text, screen, scale, color=(255, 0, 0)):
 font = pygame.font.SysFont('SimHei', WIDTH//(len(text)*2))
 textRender = font.render(text, True, color)

 # 获取此图片的矩形框
 # textRect = textRender.get_rect()
 # textRect.midtop = (WIDTH/scale[0], HEIGHT/scale[1])
 # screen.blit(textRender, textRect)

 # 初始化文字的坐标
 screen.blit(textRender, (WIDTH/scale[0], HEIGHT/scale[1]))

# 按钮
def button(text, x, y, w, h, color, screen):
 pygame.draw.rect(screen, color, (x, y, w, h))
 font = pygame.font.SysFont('SimHei', 20)
 textRender = font.render(text, True, (0, 0, 0))
 textRect = textRender.get_rect()
 textRect.center = ((x+w/2), (y+h/2))
 screen.blit(textRender, textRect)

# 生成随机的位置坐标
def get_random_pos():
 x, y = random.randint(20, 620), random.randint(20, 460)
 return x, y

# 点击喜欢按钮后显示的页面
def show_like_interface(text, screen, color=(255, 0, 0)):
 screen.fill((255, 255, 255))
 font = pygame.font.SysFont('SimHei', WIDTH//(len(text)))
 textRender = font.render(text, True, color)
 textRect = textRender.get_rect()
 textRect.midtop = (WIDTH/2, HEIGHT/2)
 screen.blit(textRender, textRect)
 pygame.display.update()
 while True:
  for event in pygame.event.get():
   if event.type == pygame.QUIT:
    pygame.quit()

def main():
 pygame.init()
 clock = pygame.time.Clock()
 unlike_pos_x = 330
 unlike_pos_y = 250
 unlike_pos_width = 80
 unlike_pos_height = 40
 unlike_color = (0, 191, 255)

 like_pos_x = 180
 like_pos_y = 250
 like_pos_width = 80
 like_pos_height = 40
 like_color = (0, 191, 255)

 running = True
 while running:
  # 填充窗口
  screen.fill((255, 255, 255))

  img = pygame.image.load('d:/love2.png')
  imgRect = img.get_rect()
  imgRect.midtop = int(WIDTH / 1.3), HEIGHT // 7
  screen.blit(img, imgRect)

  # 获取坐标
  pos = pygame.mouse.get_pos()
  if pos[0] < unlike_pos_x + unlike_pos_width + 5 and pos[0] > unlike_pos_x - 5 and pos[1] < unlike_pos_y + unlike_pos_height + 5 and pos[1] > unlike_pos_y - 5:
   while True:
    unlike_pos_x, unlike_pos_y = get_random_pos()
    if pos[0] < unlike_pos_x + unlike_pos_width + 5 and pos[
     0] > unlike_pos_x - 5 and \
     pos[1] < unlike_pos_y + unlike_pos_height + 5 and pos[
     1] > unlike_pos_y - 5:
     continue
    break

  title('小姐姐,我观察你很久了', screen, scale=[5, 8])
  title('做我女朋友好不好呀', screen, scale=[5, 4])
  button('好呀', like_pos_x, like_pos_y, like_pos_width, like_pos_height, like_color, screen)
  button('算了吧', unlike_pos_x, unlike_pos_y, unlike_pos_width, unlike_pos_height, unlike_color, screen)

  for event in pygame.event.get():
   if event.type == pygame.QUIT:
    pygame.quit()

  if pos[0] < like_pos_x + like_pos_width + 5 and pos[0] > like_pos_x - 5 and pos[1] < like_pos_y + like_pos_height + 5 and pos[1] > like_pos_y - 5:
   show_like_interface('我就知道小姐姐你也喜欢我~', screen, color=(255, 0, 0))

  pygame.display.flip()
  pygame.display.update()
  clock.tick(60)


main()
大家有好的创意也可以一起交流下;
以上就是本文的全部内容,希望对大家的学习有所帮助,也希望大家多多支持【听图阁-专注于Python设计】。