Python3+OpenCV2实现图像的几何变换(平移、镜像、缩放、旋转、仿射)
前言
总结一下最近看的关于opencv图像几何变换的一些笔记.
这是原图:

1.平移
import cv2
import numpy as np

img = cv2.imread("image0.jpg", 1)
imgInfo = img.shape
height = imgInfo[0]
width = imgInfo[1]
mode = imgInfo[2]

dst = np.zeros(imgInfo, np.uint8)

for i in range( height ):
  for j in range( width - 100 ):
    dst[i, j + 100] = img[i, j]

cv2.imshow('image', dst)
cv2.waitKey(0)
demo很简单,就是将图像向右平移了100个像素.如图:

2.镜像
import cv2
import numpy as np


img = cv2.imread('image0.jpg', 1)
cv2.imshow('src', img)
imgInfo = img.shape
height= imgInfo[0]
width = imgInfo[1]
deep = imgInfo[2]

dst = np.zeros([height*2, width, deep], np.uint8)

for i in range( height ):
  for j in range( width ):
    dst[i,j] = img[i,j]
    dst[height*2-i-1,j] = img[i,j]

for i in range(width):
  dst[height, i] = (0, 0, 255)
cv2.imshow('image', dst)
cv2.waitKey(0)
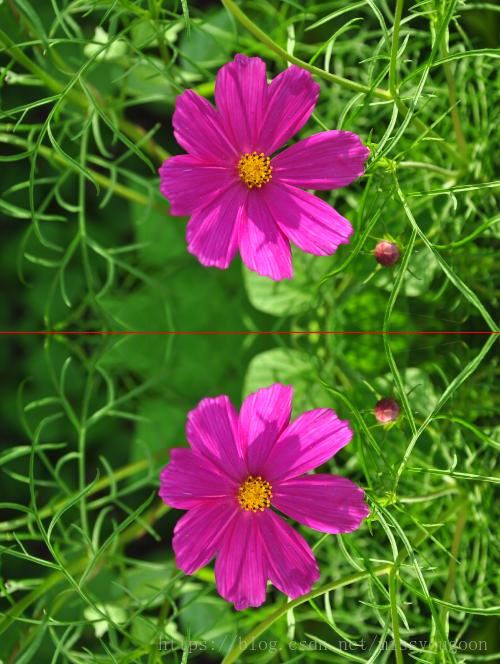
demo生成一个如下效果:

3.缩放
import cv2
img = cv2.imread("image0.jpg", 1)
imgInfo = img.shape
print( imgInfo )
height = imgInfo[0]
width = imgInfo[1]
mode = imgInfo[2]

# 1 放大 缩小 2 等比例 非等比例
dstHeight = int(height * 0.5)
dstWeight = int(width * 0.5)

# 最近邻域插值 双线性插值 像素关系重采样 立方插值
dst = cv2.resize(img, (dstWeight,dstHeight))
print(dst.shape)
cv2.imshow('image', dst)
cv2.waitKey(0)
使用resize直接进行缩放操作,同时还可以使用邻域插值法进行缩放,代码如下:
# 1 info 2 空白模板 3 重新计算x, y
import cv2
import numpy as np
img = cv2.imread('image0.jpg', 1)
imgInfo = img.shape # 先高度,后宽度
height = imgInfo[0]
width = imgInfo[1]
dstHeight = int(height/2)
dstWidth = int(width/2)

dstImage = np.zeros([dstHeight, dstWidth, 3], np.uint8)
for i in range( dstHeight ):
  for j in range(dstWidth):
    iNew = i * ( height * 1.0 / dstHeight )
    jNew = j * ( width * 1.0 / dstWidth )

    dstImage[i,j] = img[int(iNew),int(jNew)]

cv2.imshow('image', dstImage)
cv2.waitKey(0)
4.旋转
import cv2

img = cv2.imread('image0.jpg', 1)
cv2.imshow('src', img)
imgInfo = img.shape
height= imgInfo[0]
width = imgInfo[1]
deep = imgInfo[2]

# 定义一个旋转矩阵
matRotate = cv2.getRotationMatrix2D((height*0.5, width*0.5), 45, 0.7) # mat rotate 1 center 2 angle 3 缩放系数

dst = cv2.warpAffine(img, matRotate, (height, width))

cv2.imshow('image',dst)
cv2.waitKey(0)
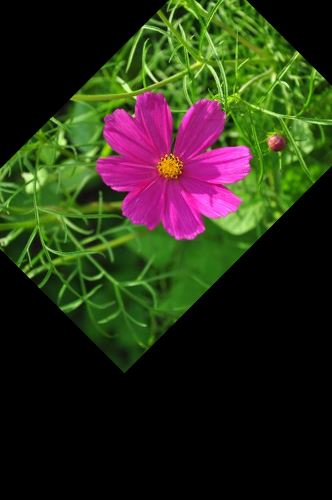
旋转需要先定义一个旋转矩阵,cv2.getRotationMatrix2D(),参数1:需要旋转的中心点.参数2:需要旋转的角度.参数三:需要缩放的比例.效果如下图:

5.仿射
import cv2
import numpy as np

img = cv2.imread('image0.jpg', 1)
cv2.imshow('src', img)
imgInfo = img.shape
height= imgInfo[0]
width = imgInfo[1]
deep = imgInfo[2]
# src 3 -> dst 3 (左上角, 左下角,右上角)
matSrc = np.float32([[0,0],[0,height-1],[width-1, 0]]) # 需要注意的是 行列 和 坐标 是不一致的
matDst = np.float32([[50,50],[100, height-50],[width-200,100]])

matAffine = cv2.getAffineTransform(matSrc,matDst) #mat 1 src 2 dst 形成组合矩阵
dst = cv2.warpAffine(img, matAffine,(height, width))
cv2.imshow('image',dst)
cv2.waitKey(0)
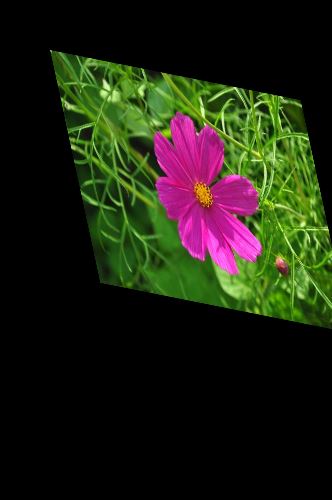
需要确定图像矩阵的三个点坐标,及(左上角, 左下角,右上角).定义两个矩阵,matSrc 为原图的三个点坐标,matDst为进行仿射的三个点坐标,通过cv2.getAffineTransform()形成组合矩阵.效果如下:

以上就是本文的全部内容,希望对大家的学习有所帮助,也希望大家多多支持【听图阁-专注于Python设计】。

