python实现PID算法及测试的例子
PID算法实现
import time

class PID:
  def __init__(self, P=0.2, I=0.0, D=0.0):
    self.Kp = P
    self.Ki = I
    self.Kd = D
    self.sample_time = 0.00
    self.current_time = time.time()
    self.last_time = self.current_time
    self.clear()
  def clear(self):
    self.SetPoint = 0.0
    self.PTerm = 0.0
    self.ITerm = 0.0
    self.DTerm = 0.0
    self.last_error = 0.0
    self.int_error = 0.0
    self.windup_guard = 20.0
    self.output = 0.0
  def update(self, feedback_value):
    error = self.SetPoint - feedback_value
    self.current_time = time.time()
    delta_time = self.current_time - self.last_time
    delta_error = error - self.last_error
    if (delta_time >= self.sample_time):
      self.PTerm = self.Kp * error#比例
      self.ITerm += error * delta_time#积分
      if (self.ITerm < -self.windup_guard):
        self.ITerm = -self.windup_guard
      elif (self.ITerm > self.windup_guard):
        self.ITerm = self.windup_guard
      self.DTerm = 0.0
      if delta_time > 0:
        self.DTerm = delta_error / delta_time
      self.last_time = self.current_time
      self.last_error = error
      self.output = self.PTerm + (self.Ki * self.ITerm) + (self.Kd * self.DTerm)
  def setKp(self, proportional_gain):
    self.Kp = proportional_gain
  def setKi(self, integral_gain):
    self.Ki = integral_gain
  def setKd(self, derivative_gain):
    self.Kd = derivative_gain
  def setWindup(self, windup):
    self.windup_guard = windup
  def setSampleTime(self, sample_time):
    self.sample_time = sample_time
测试PID算法
import PID
import time
import matplotlib
matplotlib.use("TkAgg")
import matplotlib.pyplot as plt
import numpy as np
from scipy.interpolate import spline
#这个程序的实质就是在前九秒保持零输出,在后面的操作中在传递函数为某某的系统中输出1

def test_pid(P = 0.2, I = 0.0, D= 0.0, L=100):
  """Self-test PID class

  .. note::
    ...
    for i in range(1, END):
      pid.update(feedback)
      output = pid.output
      if pid.SetPoint > 0:
        feedback += (output - (1/i))
      if i>9:
        pid.SetPoint = 1
      time.sleep(0.02)
    ---
  """
  pid = PID.PID(P, I, D)

  pid.SetPoint=0.0
  pid.setSampleTime(0.01)

  END = L
  feedback = 0

  feedback_list = []
  time_list = []
  setpoint_list = []

  for i in range(1, END):
    pid.update(feedback)
    output = pid.output
    if pid.SetPoint > 0:
      feedback +=output# (output - (1/i))控制系统的函数
    if i>9:
      pid.SetPoint = 1
    time.sleep(0.01)

    feedback_list.append(feedback)
    setpoint_list.append(pid.SetPoint)
    time_list.append(i)

  time_sm = np.array(time_list)
  time_smooth = np.linspace(time_sm.min(), time_sm.max(), 300)
  feedback_smooth = spline(time_list, feedback_list, time_smooth)
  plt.figure(0)
  plt.plot(time_smooth, feedback_smooth)
  plt.plot(time_list, setpoint_list)
  plt.xlim((0, L))
  plt.ylim((min(feedback_list)-0.5, max(feedback_list)+0.5))
  plt.xlabel('time (s)')
  plt.ylabel('PID (PV)')
  plt.title('TEST PID')

  plt.ylim((1-0.5, 1+0.5))

  plt.grid(True)
  plt.show()

if __name__ == "__main__":
  test_pid(1.2, 1, 0.001, L=80)
#  test_pid(0.8, L=50)
结果
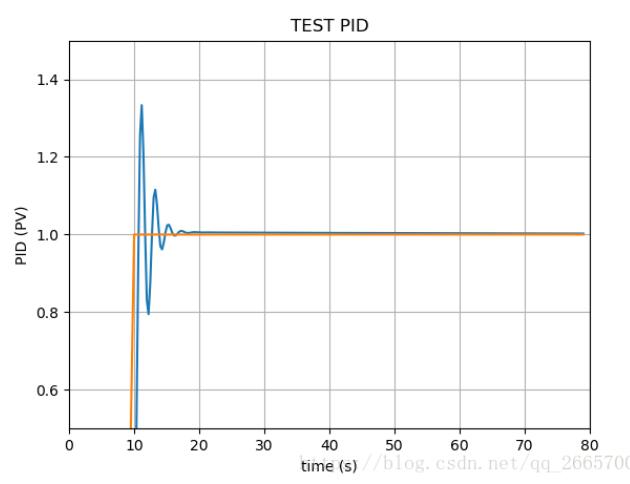
以上这篇python实现PID算法及测试的例子就是小编分享给大家的全部内容了,希望能给大家一个参考,也希望大家多多支持【听图阁-专注于Python设计】。
