Python matplotlib生成图片背景透明的示例代码
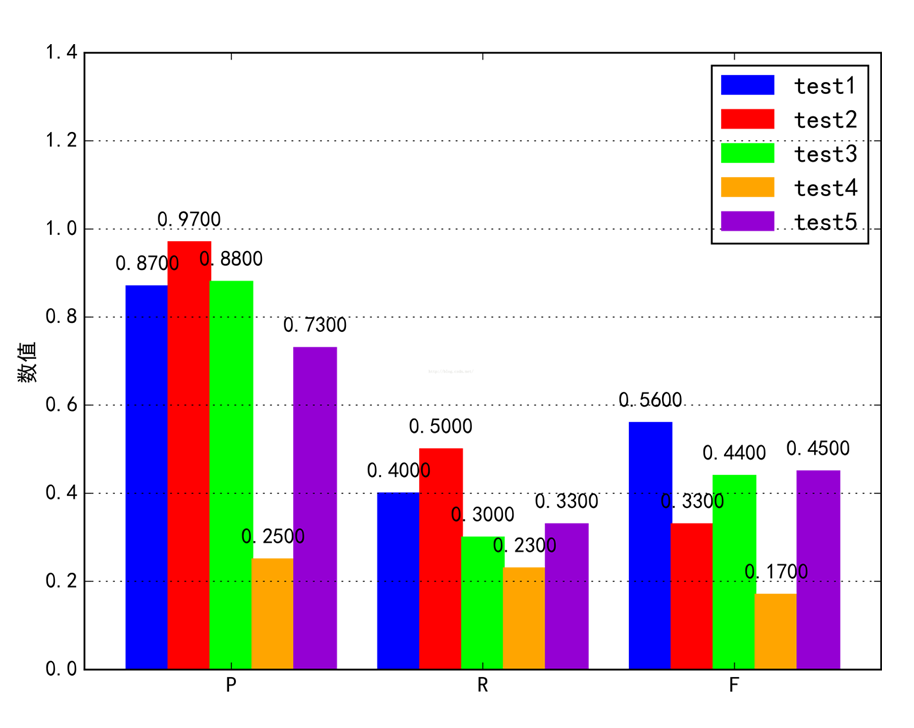
使用matplotlib生成图片,想要背景透明,而且图例部分也显示透明效果,找到了大概的设置方法,特此记录。
# coding=utf-8
# matplotlib背景透明示例图
# python 3.5

import numpy as np
import matplotlib.pyplot as plt
from pylab import mpl
import scipy.stats as stats

# 设置中文字体
mpl.rcParams['font.sans-serif'] = ['SimHei']


def autolabel(rects):
  # attach some text labels
  for rect in rects:
    height = rect.get_height()
    # 设置标注文字及位置
    ax.text(rect.get_x() + rect.get_width() / 2, 0.03 + height, '%.4f' % height, ha='center', va='bottom')

# 数据
testData = [[0.87, 0.40, 0.56],
      [0.97, 0.50, 0.33],
      [0.88, 0.30, 0.44],
      [0.25, 0.23, 0.17],
      [0.73, 0.33, 0.45]]

N = 3
width = 0.5
ind = np.arange(width, width*6*N, width*6)

fig, ax = plt.subplots()
rectsTest1 = ax.bar(ind, (testData[0][0], testData[0][1], testData[0][2]), width, color=(0, 0, 1, 1), edgecolor=(0, 0, 1, 1))

rectsTest2 = ax.bar(ind + width, (testData[1][0], testData[1][1], testData[1][2]), width, color=(1, 0, 0, 1), edgecolor=(1, 0, 0, 1))

rectsTest3 = ax.bar(ind + 2*width, (testData[2][0], testData[2][1], testData[2][2]), width, color=(0, 1, 0, 1), edgecolor=(0, 1, 0, 1))

rectsTest4 = ax.bar(ind + 3*width, (testData[3][0], testData[3][1], testData[3][2]), width, color=(1, 0.6471, 0, 1), edgecolor=(1, 0.6471, 0, 1))

rectsTest5 = ax.bar(ind + 4*width, (testData[4][0], testData[4][1], testData[4][2]), width, color=(0.5804, 0, 0.8275, 1), edgecolor=(0.5804, 0, 0.8275, 1))

ax.set_xlim(0, 9.5)
ax.set_ylim(0, 1.4)
ax.set_ylabel('数值')
ax.yaxis.grid(True)
ax.set_xticks(ind + width * 2.5)
ax.set_xticklabels(('P', 'R', 'F'))

# 设置图例
legend = ax.legend((rectsTest1, rectsTest2, rectsTest3, rectsTest4, rectsTest5), ('test1', 'test2', 'test3', 'test4', 'test5'))
frame = legend.get_frame()
frame.set_alpha(1)
frame.set_facecolor('none') # 设置图例legend背景透明

# 给每个数据矩形标注数值
autolabel(rectsTest1)
autolabel(rectsTest2)
autolabel(rectsTest3)
autolabel(rectsTest4)
autolabel(rectsTest5)

plt.savefig('C:/Users/XX/Desktop/test.png', format='png', bbox_inches='tight', transparent=True, dpi=600) # bbox_inches='tight' 图片边界空白紧致, 背景透明
效
效果可能在网页上看不出来,但还是把图片贴上来吧。
以上就是本文的全部内容,希望对大家的学习有所帮助,也希望大家多多支持【听图阁-专注于Python设计】。