wxPython之wx.DC绘制形状
本文实例为大家分享了wxPython绘制形状的具体代码,供大家参考,具体内容如下
绘制形状
除了绘制文本和位图,DC也可以绘制任意的形状和线。这允许我们完全自定义窗口部件和控件的外观。
示例说明
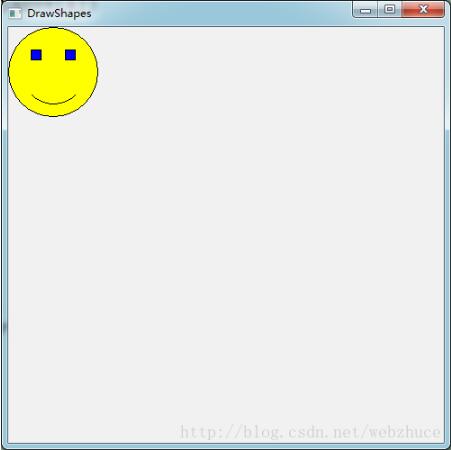
利用PaintDC创建一个简单笑脸控件。
#-*-coding: UTF-8 -*-
#------------------------------------------------------
#Purpose: nothing....

#Author: 阿Bin先生
#Created: 2017年5月21日
#------------------------------------------------------
import wx

class Smiley(wx.PyControl):
  def __init__(self, parent, size=(100, 100)):
    super(Smiley, self).__init__(parent,
    size=size,
    style=wx.NO_BORDER)
    # Event Handlers
    self.Bind(wx.EVT_PAINT, self.OnPaint)

  def OnPaint(self, event):
    """Draw the image on to the panel"""
    dc = wx.PaintDC(self) # Must create a PaintDC
    # Get the working rectangle we can draw in
    rect = self.GetClientRect()
    # Setup the DC
    dc.SetPen(wx.BLACK_PEN) # for drawing lines / borders
    yellowbrush = wx.Brush(wx.Colour(255, 255, 0))
    dc.SetBrush(yellowbrush) # Yellow fill

    cx = (rect.width / 2) + rect.x
    cy = (rect.width / 2) + rect.y
    radius = min(rect.width, rect.height) / 2
    dc.DrawCircle(cx, cy, radius)
    eyesz = (rect.width / 8, rect.height / 8)
    eyepos = (cx / 2, cy / 2)
    dc.SetBrush(wx.BLUE_BRUSH)
    dc.DrawRectangle(eyepos[0], eyepos[1],
    eyesz[0], eyesz[1])
    eyepos = (eyepos[0] + (cx - eyesz[0]), eyepos[1])
    dc.DrawRectangle(eyepos[0], eyepos[1],
    eyesz[0], eyesz[1])
    dc.SetBrush(yellowbrush)
    startpos = (cx / 2, (cy / 2) + cy)
    endpos = (cx + startpos[0], startpos[1])
    dc.DrawArc(startpos[0], startpos[1],
    endpos[0], endpos[1], cx, cy)
    dc.SetPen(wx.TRANSPARENT_PEN)
    dc.DrawRectangle(startpos[0], cy,
    endpos[0] - startpos[0],
    startpos[1] - cy)

class MyFrame(wx.Frame):
  def __init__(self, parent, *args, **kwargs):
    super(MyFrame, self).__init__(parent, *args, **kwargs)
    # Attributes
    self.Panel = wx.Panel(self)
    Smiley(self.Panel)

class MyApp(wx.App):
  def OnInit(self):
    self.frame = MyFrame(None, title="DrawShapes",size = [500, 500])
    self.SetTopWindow(self.frame)
    self.frame.Show()
    return True

if __name__ == "__main__":
  app = MyApp(False)
  app.MainLoop()
运行结果:
示例分析
DC的SetPen用来绘制线条和形状的边框。DC的SetBrush用来填充颜色。首先使用DCdeDrawCircle绘制一个黑色边框的黄色圆,表示头。然后使用DrawRectangle方法绘制蓝色矩形,表示眼睛。最后使用DC的DrawArch方法绘制扇形,因为只想用圆弧来表示微笑,所以用矩形覆盖圆弧两端的两条半径线。
常用的基本绘制函数


以上就是本文的全部内容,希望对大家的学习有所帮助,也希望大家多多支持【听图阁-专注于Python设计】。