详解opencv中画圆circle函数和椭圆ellipse函数
1. void ellipse(InputOutputArray img, Point center, Size axes, double angle, double startAngle, double endAngle,
const Scalar& color, int thickness = 1, int lineType = LINE_8, int shift = 0);
ellipse函数将椭圆画到图像 lmg 上, 椭圆中心为点center,并且大小位于矩形 axes 内,椭圆旋转角度为 angle, 扩展的弧度从 0 度到 360 度,
图形颜色为 Scalar(x, y,z),线宽 (thickness)为 1,线型(lineType)为 8 (8 联通线型)。
2. void circle(InputOutputArray img, Point center, int radius, const Scalar& color, int thickness = 1, int lineType = LINE_8, int shift = 0);
img :表示输入的图像
center: 圆心坐标
radius: 圆的半径
color:Scalar类型,表示圆的颜色,例如蓝色为Scalar(255,0,0)
thickness:线的宽度
lineType:线的类型,(默认为8联通型)
#include<iostream>
#include<opencv2/opencv.hpp>
using namespace cv;
using namespace std;
#define WINDOW_NAME1 "绘制图1"
#define WINDOW_NAME2 "绘制图2"
#define WINDOW_WIDTH 600  //定义窗口大小
string image = "C:\\Users\\asus\\Pictures\\Saved Pictures\\123.jpg";
void DrawEllipse(Mat img, double angle);
void DrawFi1ledCirc1e(Mat img, Point center);
int main()
{
  Mat atomImage = Mat::zeros(WINDOW_WIDTH, WINDOW_WIDTH, CV_8UC3);
  Mat rookImage = Mat::zeros(WINDOW_WIDTH, WINDOW_WIDTH, CV_8UC3);
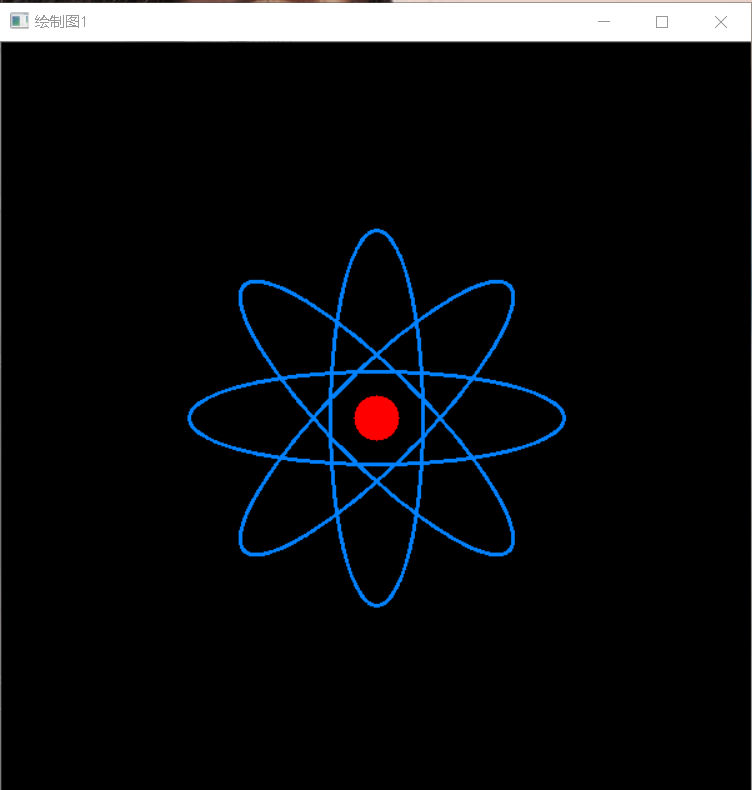
  //绘制椭圆
  DrawEllipse(atomImage, 90);
  DrawEllipse(atomImage, 0);
  DrawEllipse(atomImage, 45);
  DrawEllipse(atomImage, -45);
  //绘制圆心
  DrawFi1ledCirc1e(atomImage, Point(WINDOW_WIDTH / 2,WINDOW_WIDTH / 2));
  imshow(WINDOW_NAME1, atomImage);
  waitKey(0);
  return 0;
}
void DrawEllipse(Mat img, double angle) {
  int thickness = 2;
  int lineType = 8;
  ellipse(img, Point(WINDOW_WIDTH / 2, WINDOW_WIDTH / 2),
    Size(WINDOW_WIDTH / 4, WINDOW_WIDTH / 16), angle, 0, 360, Scalar(255, 129, 0),
    thickness, lineType);
}
void DrawFi1ledCirc1e(Mat img, Point center) {
  int thickness = -1;
  int lineType = 8;
  circle(img, center, WINDOW_WIDTH / 32, Scalar(0, 0, 255), thickness, lineType);
}
总结
以上所述是小编给大家介绍的opencv中画圆circle函数和椭圆ellipse函数,希望对大家有所帮助,如果大家有任何疑问请给我留言,小编会及时回复大家的。在此也非常感谢大家对【听图阁-专注于Python设计】网站的支持!
如果你觉得本文对你有帮助,欢迎转载,烦请注明出处,谢谢!