Pytorch实现GoogLeNet的方法
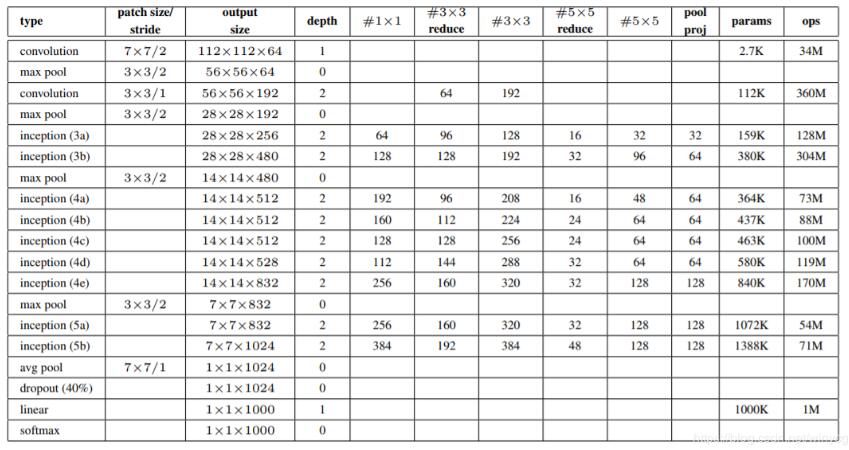
GoogLeNet也叫InceptionNet,在2014年被提出,如今已到V4版本。GoogleNet比VGGNet具有更深的网络结构,一共有22层,但是参数比AlexNet要少12倍,但是计算量是AlexNet的4倍,原因就是它采用很有效的Inception模块,并且没有全连接层。
最重要的创新点就在于使用inception模块,通过使用不同维度的卷积提取不同尺度的特征图。左图是最初的Inception模块,右图是使用的1×1得卷积对左图的改进,降低了输入的特征图维度,同时降低了网络的参数量和计算复杂度,称为inception V1。

GoogleNet在架构设计上为保持低层为传统卷积方式不变,只在较高的层开始用Inception模块。
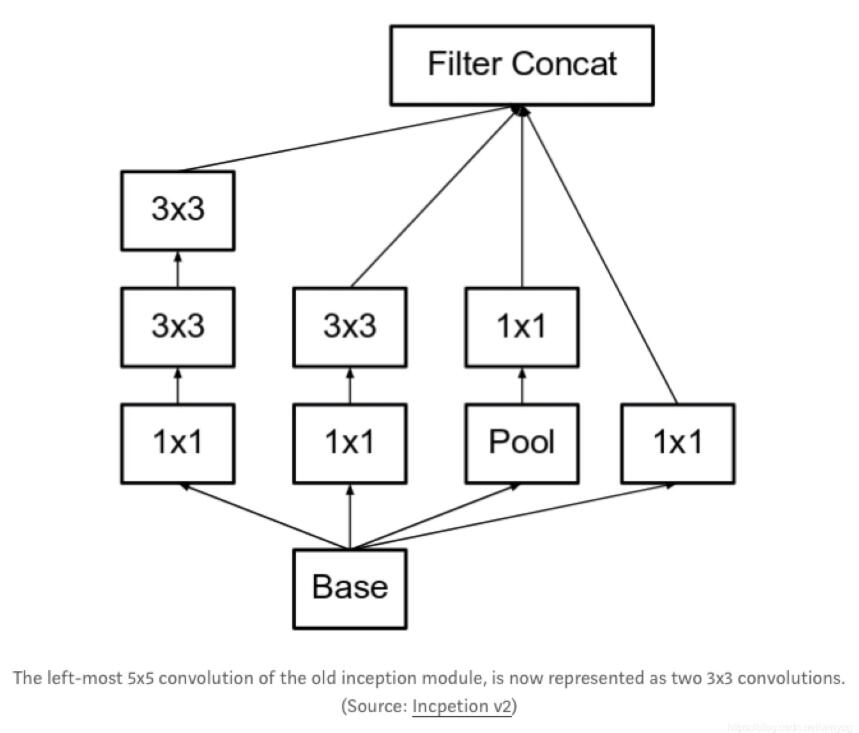
inception V2中将5x5的卷积改为2个3x3的卷积,扩大了感受野,原来是5x5,现在是6x6。Pytorch实现GoogLeNet(inception V2):
'''GoogLeNet with PyTorch.'''
import torch
import torch.nn as nn
import torch.nn.functional as F

# 编写卷积+bn+relu模块
class BasicConv2d(nn.Module):
  def __init__(self, in_channels, out_channals, **kwargs):
    super(BasicConv2d, self).__init__()
    self.conv = nn.Conv2d(in_channels, out_channals, **kwargs)
    self.bn = nn.BatchNorm2d(out_channals)

  def forward(self, x):
    x = self.conv(x)
    x = self.bn(x)
    return F.relu(x)

# 编写Inception模块
class Inception(nn.Module):
  def __init__(self, in_planes,
         n1x1, n3x3red, n3x3, n5x5red, n5x5, pool_planes):
    super(Inception, self).__init__()
    # 1x1 conv branch
    self.b1 = BasicConv2d(in_planes, n1x1, kernel_size=1)

    # 1x1 conv -> 3x3 conv branch
    self.b2_1x1_a = BasicConv2d(in_planes, n3x3red,
                  kernel_size=1)
    self.b2_3x3_b = BasicConv2d(n3x3red, n3x3,
                  kernel_size=3, padding=1)

    # 1x1 conv -> 3x3 conv -> 3x3 conv branch
    self.b3_1x1_a = BasicConv2d(in_planes, n5x5red,
                  kernel_size=1)
    self.b3_3x3_b = BasicConv2d(n5x5red, n5x5,
                  kernel_size=3, padding=1)
    self.b3_3x3_c = BasicConv2d(n5x5, n5x5,
                  kernel_size=3, padding=1)

    # 3x3 pool -> 1x1 conv branch
    self.b4_pool = nn.MaxPool2d(3, stride=1, padding=1)
    self.b4_1x1 = BasicConv2d(in_planes, pool_planes,
                 kernel_size=1)

  def forward(self, x):
    y1 = self.b1(x)
    y2 = self.b2_3x3_b(self.b2_1x1_a(x))
    y3 = self.b3_3x3_c(self.b3_3x3_b(self.b3_1x1_a(x)))
    y4 = self.b4_1x1(self.b4_pool(x))
    # y的维度为[batch_size, out_channels, C_out,L_out]
    # 合并不同卷积下的特征图
    return torch.cat([y1, y2, y3, y4], 1)


class GoogLeNet(nn.Module):
  def __init__(self):
    super(GoogLeNet, self).__init__()
    self.pre_layers = BasicConv2d(3, 192,
                   kernel_size=3, padding=1)

    self.a3 = Inception(192, 64, 96, 128, 16, 32, 32)
    self.b3 = Inception(256, 128, 128, 192, 32, 96, 64)

    self.maxpool = nn.MaxPool2d(3, stride=2, padding=1)

    self.a4 = Inception(480, 192, 96, 208, 16, 48, 64)
    self.b4 = Inception(512, 160, 112, 224, 24, 64, 64)
    self.c4 = Inception(512, 128, 128, 256, 24, 64, 64)
    self.d4 = Inception(512, 112, 144, 288, 32, 64, 64)
    self.e4 = Inception(528, 256, 160, 320, 32, 128, 128)

    self.a5 = Inception(832, 256, 160, 320, 32, 128, 128)
    self.b5 = Inception(832, 384, 192, 384, 48, 128, 128)

    self.avgpool = nn.AvgPool2d(8, stride=1)
    self.linear = nn.Linear(1024, 10)

  def forward(self, x):
    out = self.pre_layers(x)
    out = self.a3(out)
    out = self.b3(out)
    out = self.maxpool(out)
    out = self.a4(out)
    out = self.b4(out)
    out = self.c4(out)
    out = self.d4(out)
    out = self.e4(out)
    out = self.maxpool(out)
    out = self.a5(out)
    out = self.b5(out)
    out = self.avgpool(out)
    out = out.view(out.size(0), -1)
    out = self.linear(out)
    return out


def test():
  net = GoogLeNet()
  x = torch.randn(1,3,32,32)
  y = net(x)
  print(y.size())

test()
以上这篇Pytorch实现GoogLeNet的方法就是小编分享给大家的全部内容了,希望能给大家一个参考,也希望大家多多支持【听图阁-专注于Python设计】。


