python2和python3实现在图片上加汉字的方法
python2和python3实现在图片上加汉字,最主要的区别还是内部编码方式不一样导致的,在代码上表现为些许的差别。理解了内部编码原理也就不会遇到这些问题了,以下代码是在WIN10系统上时测好用的。
Python2 在图片上加汉字代码实现
# -*- coding: cp936 -*-
import cv2
import numpy as np
from PIL import Image, ImageDraw, ImageFont
def ID_2_Word(txt):
tmp_ID = txt.split(':')[0]
value = txt.split(':')[-1]
'''
numbers = {
'DS041' : "Coolant TEMP ",
'DS048' : "RPM ",
'DS049' : "Speed ",
'DS098' : "Oil level ",
'DS123' : "Control Module Voltage"
}
'''
numbers = {
'DS041' : "冷却液温度",
'DS048' : "发动机转速",
'DS049' : "车速 ",
'DS098' : "燃油液位输入",
'DS123' : "控制模块电压"
}
word = numbers.get(tmp_ID, None)
result = str(word) + ':' + value
#print(result)
return result
def cv2ImgAddText(img, text, left, top, textColor=(0, 255, 0), textSize=20):
if (isinstance(img, np.ndarray)): #判断是否OpenCV图片类型
img = Image.fromarray(cv2.cvtColor(img, cv2.COLOR_BGR2RGB))
draw = ImageDraw.Draw(img)
#fontText = ImageFont.truetype("font/simsun.ttc", textSize, encoding="utf-8")
fontText = ImageFont.truetype("font/simsun.ttc", textSize, encoding="gb2312") #cp936
draw.text((left, top), text, textColor, font=fontText)
return cv2.cvtColor(np.asarray(img), cv2.COLOR_RGB2BGR)
def layer1_show(img,data):
frame = cv2.resize(img, (1280, 720), interpolation=cv2.INTER_CUBIC)
font = ImageFont.truetype('font/simsun.ttc',24,encoding="utf-8")
OBD_string = data
y0, dy = 50, 25
for i, txt in enumerate(OBD_string.split(';')):
#word = txt
word = ID_2_Word(txt) #将OBD信号的ID转换为中文
word = unicode(word,'gbk')
#print(i, txt.split(':')[0])
y = y0+i*dy
frame = cv2ImgAddText(frame, word, 100, y, (255, 0, 0), 20)
cv2.imshow("layer_1", frame)
cv2.waitKey(0)
if __name__ == '__main__':
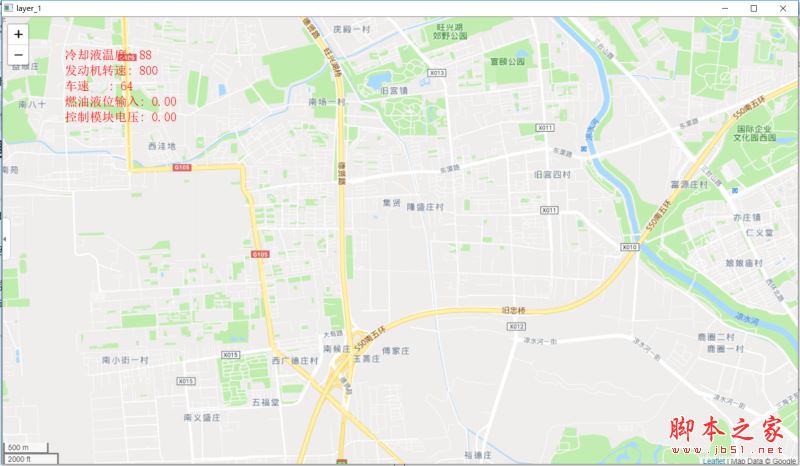
img = cv2.imread("map.png");
data = "DS041: 88;DS048: 800;DS049: 64;DS098: 0.00;DS123: 0.00"
layer1_show(img,data)
Python3 在图片上加汉字代码实现
import cv2
import numpy as np
from PIL import Image, ImageDraw, ImageFont
def ID_2_Word(txt):
tmp_ID = txt.split(':')[0]
value = txt.split(':')[-1]
'''
numbers = {
'DS041' : "Coolant TEMP ",
'DS048' : "RPM ",
'DS049' : "Speed ",
'DS098' : "Oil level ",
'DS123' : "Control Module Voltage"
}
'''
numbers = {
'DS041' : "冷却液温度",
'DS048' : "发动机转速",
'DS049' : "车速 ",
'DS098' : "燃油液位输入",
'DS123' : "控制模块电压"
}
word = numbers.get(tmp_ID, None)
result = str(word) + ':' + value
#print(result)
return result
def cv2ImgAddText(img, text, left, top, textColor=(0, 255, 0), textSize=20):
if (isinstance(img, np.ndarray)): #判断是否OpenCV图片类型
img = Image.fromarray(cv2.cvtColor(img, cv2.COLOR_BGR2RGB))
draw = ImageDraw.Draw(img)
#fontText = ImageFont.truetype("font/simsun.ttc", textSize, encoding="utf-8")
fontText = ImageFont.truetype("font/simsun.ttc", textSize, encoding="gb2312") #cp936
draw.text((left, top), text, textColor, font=fontText)
return cv2.cvtColor(np.asarray(img), cv2.COLOR_RGB2BGR)
def layer1_show(img,data):
frame = cv2.resize(img, (1280, 720), interpolation=cv2.INTER_CUBIC)
font = ImageFont.truetype('font/simsun.ttc',24,encoding="utf-8")
OBD_string = data
y0, dy = 50, 25
for i, txt in enumerate(OBD_string.split(';')):
#word = txt
word = ID_2_Word(txt) #将OBD信号的ID转换为中文
#word = unicode(word,'gbk')
y = y0+i*dy
frame = cv2ImgAddText(frame, word, 100, y, (255, 0, 0), 20)
cv2.imshow("layer_1", frame)
cv2.waitKey(0)
if __name__ == '__main__':
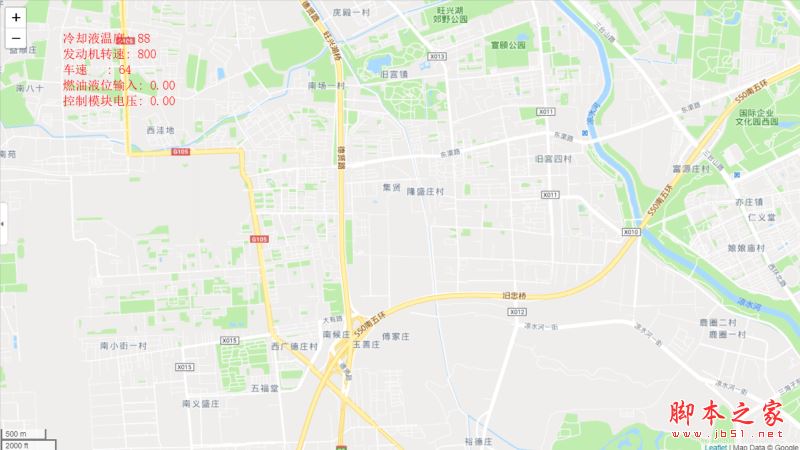
img = cv2.imread("map.png");
data = "DS041: 88;DS048: 800;DS049: 64;DS098: 0.00;DS123: 0.00"
layer1_show(img,data)
遇到的问题
python2中:UnicodeDecodeError: ‘ascii' codec can't decode byte 0xe8 in position 0: ordinal not in range(128)
这是因为这是因为默认的是utf-8编码格式
中文字符的Unicode编码0x0800-0xFFFF之间,(utf-8包含了部分汉字)
当你试图将该“中文字符”转成U码的utf-8时超出了其范筹
而GBK 规范收录了 ISO 10646.1 中的全部 CJK 汉字和符号,并有所补充,
所以解决方法是将utf-8改为gbk
word = unicode(word,'utf-8') 改为 word = unicode(word,'gbk')
总结
以上所述是小编给大家介绍的python2和python3实现在图片上加汉字的方法,希望对大家有所帮助,如果大家有任何疑问请给我留言,小编会及时回复大家的。在此也非常感谢大家对【听图阁-专注于Python设计】网站的支持!
如果你觉得本文对你有帮助,欢迎转载,烦请注明出处,谢谢!

